In many ways, food is a visual art. Think about it: if something looks good, then you’re more likely to want to try a bite of it, right?
If you’re thinking about starting a blog revolving around food, know that it can be difficult to translate the way your recipes taste to the way they look on camera. Not everyone has the means to buy magazine-worthy production equipment, but that doesn’t mean that you can’t create high-quality images all on your own. Whether you’re working on photographing a new recipe or curating pictures for your Instagram feed, there’s a lot you can do to make your images appear magazine-cover quality.
In this article, we’ll share 10 essential tips to take your food photography skills to the next level.
10 essential tips for mouth-watering food photography
When you look at the cover of a cooking magazine, all you see is the glossy, aesthetically-pleasing finished product. What you don’t see are the food stylists, photographers, and other crew members that worked for hours to get that final shot. Believe it or not, making food look good can actually be quite difficult.
The good news? You don’t need a high production budget or an entire crew of people to get high-quality images that will captivate your audience. We compiled the top 10 tips to elevate your food picture-taking skills. Let’s get started.
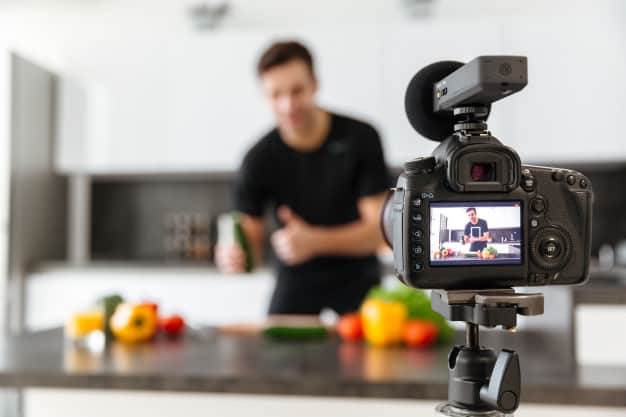
Tip 1: Get the right food photography equipment
You won’t need to drop hundreds of dollars on a new camera, but you will need some simple gear to get started. Here’s what basic equipment you will need:
Camera equipment
If you already have professional camera equipment such as a DSLR and a tripod, you’re off to a good start. If not, that’s OK too. A smartphone will suffice if you’re just starting out.
Lighting
Natural light is the best option for food photography, but it’s not always going to be available and look how you want it to. Consider investing in an artificial light, such as a studio strobe or continuous light, so you have more to work with when the natural light isn’t cooperating.
Reflector
Sometimes also referred to as a bounce board, a reflector allows you to control where the light goes and the angles of the subject that it hits by diffusing it in different directions. With a reflector, you have the power to manipulate highlights and shadows to your liking.
Software
If you want your images to look their best, it’s a good idea to invest in photo editing software. An editing solution won’t fix a bad picture, but it will enhance an already great photograph.
Tip 2: Find a space that allows for versatile backdrops
Once you have all of the necessary equipment, it’s time to figure out where to put it. Unless you have a studio, you should find a spot in your home that has the best access to natural light. Practice taking photographs in different areas until you find one that you’re satisfied with. You may think that the corner in your living room has good lighting, but it could show up entirely different on camera.
You’ll also need to think about the type of backdrop that your pictures will have. Ideally, your photographs would be taken in a real kitchen or dining room setting with an authentic backdrop, but that’s not always realistic and doesn’t allow for variety. An easier option is to buy or make your own backdrops. Most are sold online for under $100 and can be re-used to set up different scenes for your food photography.
Tip 3: Choose props that complement the food
One of the easiest ways to take your food photography to the next level is through the use of props. As a photography tool, props allow your image to come to life and give it the necessary context. The best part? You don’t have to spend a fortune buying new items – there are plenty of props that you likely already have lying around the house.
A prop can be any item that enhances your image: a cutting board, napkins, silverware, parchment paper, and even the plates or bowls that the food is placed in.
Tip 4: Don’t overlook small details
Unless you’re shooting an entire scene, most pictures of food that you will take are going to be close up. This means that the smallest details, down to the food crumbs and water droplets, make a big difference.
To have more control over how these details appear on camera, consider investing in a few simple tools that will make your life easier. For example, a pair of tweezers are useful for making small adjustments to food without touching it. Another helpful tool is a spray bottle – a few spritzes of water make produce instantly appear fresher.
Looking to make a bigger investment? Look into macro lenses for your camera or phone to capture every last detail.
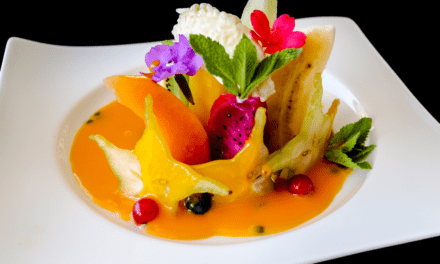
Tip 5: Make sure the food is camera-ready
As you know by now, there’s a lot that has to be done before you pick up the camera and start shooting. In the same way that a model needs to be styled and go through hair and makeup before a photoshoot, you’ll assume the role of food stylist before you begin taking pictures.
Once the food is prepared, place a small to medium-sized amount of it on the applicable dishware (i.e plate, bowl, mason jar, etc.) You don’t want to overwhelm the shot with too much food as it can be distracting. Be mindful to keep everything looking realistic.
For example, garnishes look great aesthetically-speaking, but they can also be distracting if they’re not edible or realistic. Add a prop or two to complete the setting, but only if it makes sense within the context of the story you’re trying to tell. Don’t add props just to add them; have a sense of focus.
Tip 6: Experiment with different angles
There’s no one-size-fits-all solution when it comes to camera angles for food photography. It all depends on what you’re trying to convey in the image. Some details are more important than others; adjust your angle to highlight what’s most relevant to the story you’re trying to tell. At a glance, here are a few popular angles used for food photography:
The head-on angle
This shot is at a zero degree angle where the camera is pointed directly at the subject. Keep in mind that the viewer is only able to see the front of the dish, so if there’s a topping you want to highlight, this might not be the best choice. On the flip side, If you’re trying to show off a food that has height, like a milkshake, this would be the right angle to use.
The overhead angle
If you’re capturing a spread or a bigger layout with many props, a 90-degree angle is a good choice. However, you’re sacrificing depth and the ability to see the food from close up.
The 45-degree angle
This angle hits a sweet spot for some when it comes to food photography, since it combines both height and depth.
Tip 7: Don’t overload the picture frame
It can be tempting to try and fit as much as possible in the picture. Always keep in mind that the picture you’re taking is just one part of a bigger story. Your focus should be on highlighting what’s important. Anything that’s distracting should be removed from the frame altogether. In other words, don’t overcrowd the image and do use negative space to your advantage.
Tip 8: Get creative with colors and tones
You don’t have to be an expert in color theory to know that it plays an important role in the overall aesthetic of an image. Some colors are warm, others are cold. Some colors are subtle, others are bold. It’s a good idea to keep in mind what emotion you want your audience to feel when looking at your picture.
Be mindful of how the colors of the food mesh with any props or dishware that’s included in the frame. Avoid harsh patterns or colors that don’t blend well. Strive to create something that’s cohesive and pleasing to the eye.
Tip 9: Your picture isn’t done until it’s edited
Even after you’ve put in the effort to set up a photo-ready backdrop, meticulously style your food, and shoot it in prime lighting, there are some elements that may just translate poorly on the finished photograph. That’s where editing comes in.
Using a photo editing tool, you have the ability to manipulate the picture in many different ways to achieve your desired final result. As much as you try to control lighting, it’s not always possible to get it perfect using your camera alone. Editing the picture after it’s shot will help you to fix any imbalances and get the lighting just right. Additionally, you can edit out anything that looks awry, such as a stray crumb.
Tip 10: Enhance your pictures with written content
A picture may be worth a thousand words but it’s going to take more than one good picture to capture and keep your audience’s attention. If you’re putting in the time and effort to take great images, you want to make sure people are seeing them. Create high-quality content to support your photographs. This could come in the form of blog content, recipes, or even videos. These elements should work together to tell a story and provide your audience with value that keeps them coming back.
With these tips in mind, approach your next food photography project as an opportunity to experiment and try different techniques. Keep tabs on how your audience is responding and make changes accordingly. Before you know it, food photography will be a piece of cake.
Source: G2 Learning Hub. Reproduced for educational purposes.


